Supabase Setup
Here, you will find the setup instructions for creating or updating a table, creating a Supabase Storage Bucket, and adding an RLS policy in supabase bucket.
-
Create a New Project in your Supabase account.
-
Now, go to the API Settings (opens in a new tab) in the dashboard to get the Project Url, Anon Key and Service Role Key
-
Optionally, follow the auth setup to configure authentication with supabase
Create an User Table
-
Go to the SQL Editor (opens in a new tab)
-
Enter the following SQL query to automatically create a public user table that is synced with Supabase's auth table. Whenever a new user signs up, a new entry will be added to this table via Supabase Auth.
User Table-- Enum Type for subscription type create type subscriptiontype as enum ('free', 'standard', 'premium'); -- Create a table for public users create table users ( id uuid references auth.users on delete cascade not null primary key, created_at timestamp with time zone not null default now(), email text not null, full_name text null, avatar_url text null, plan public.subscriptiontype not null default 'free'::subscriptiontype, credits integer not null default 5, constraint users_email_key unique (email) ); -- Set up Row Level Security (RLS) alter table users enable row level security; create policy "Users can insert their own row." on users for insert with check (auth.uid() = id); create policy "Users can update own row" on users for update using (auth.uid() = id); create policy "Users can read own row" on users for select using (auth.uid() = id); -- This trigger automatically creates a profile entry when a new user signs up via Supabase Auth. create function public.handle_new_user() returns trigger as $$ begin insert into public.users (id, email, full_name, avatar_url) values (new.id, new.email, new.raw_user_meta_data->>'full_name', new.raw_user_meta_data->>'avatar_url'); return new; end; $$ language plpgsql security definer; create trigger on_auth_user_created_trigger after insert on auth.users for each row execute procedure public.handle_new_user();
The, SQL script provided below enables the RLS policy by default for that table.
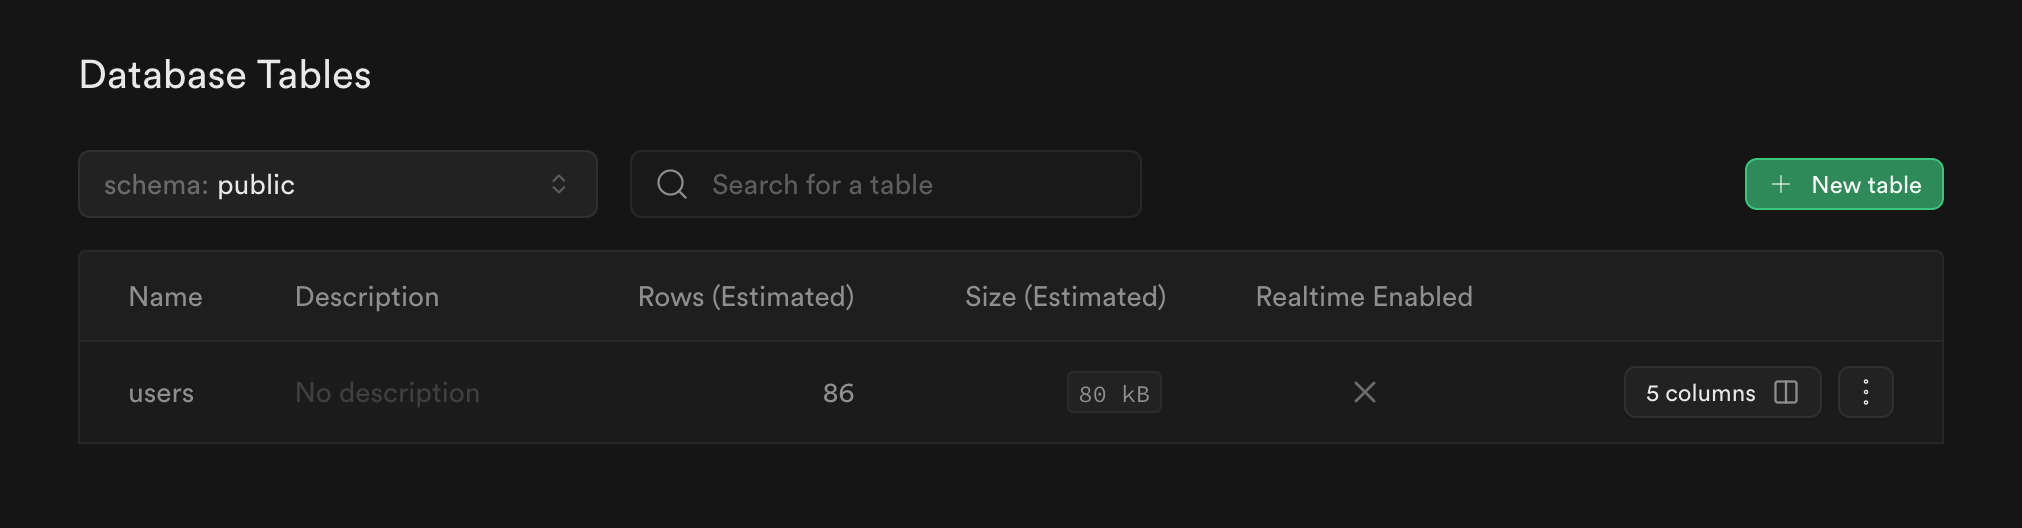
An user table should be created in your supabase project as seen below. Check here to verify (opens in a new tab).
Create a Subscriptions Table
This table will store user subscription data. Running this script will set up row-level security policies, and create a trigger & function to automatically insert a new subscription record for each new user.
-- Create a table for User Subscription

-- Enum Type for billing cycle
create type billingcycle as enum ('month', 'year');

-- Table
create table
  public.subscriptions (
    id uuid not null default gen_random_uuid (),
    created_at timestamp with time zone not null default now(),
    type public.subscriptiontype not null default 'free'::subscriptiontype,
    subscription_id text null,
    amount int null,
    interval public.billingcycle null,
    start_date date null,
    active boolean null,
    user_email text not null,
    user_id uuid not null,
    constraint subscriptions_pkey primary key (id),
    constraint subscriptions_user_email_fkey foreign key (user_email) references users (email),
    constraint subscriptions_user_id_fkey foreign key (user_id) references users (id)
  ) tablespace pg_default;

-- Set up Row Level Security (RLS)
-- See https://supabase.com/docs/guides/auth/row-level-security for more details.
alter table subscriptions
  enable row level security;

create policy "Users can insert their own row." on subscriptions
  for insert with check (auth.uid() = id);

create policy "Users can read own row" on subscriptions
  for select using (auth.uid() = id);

-- Function to handle new subscription for users
create function public.handle_new_subscription()
returns trigger as $$
BEGIN
  -- Insert a new subscription record for the new user
  insert into public.subscriptions (user_id, user_email)
  values (new.id, new.email);

  return new;
END;
$$ language plpgsql security definer;

-- Trigger to execute the function after a new user is created
create trigger on_user_created
  after insert on auth.users
  for each row execute procedure public.handle_new_subscription();
Editing a Supabase Table
Additionally, you can add more columns to the table if required. Just add the necessary column with its type after line 7 in the script.
You can also add a new column from the dashboard.
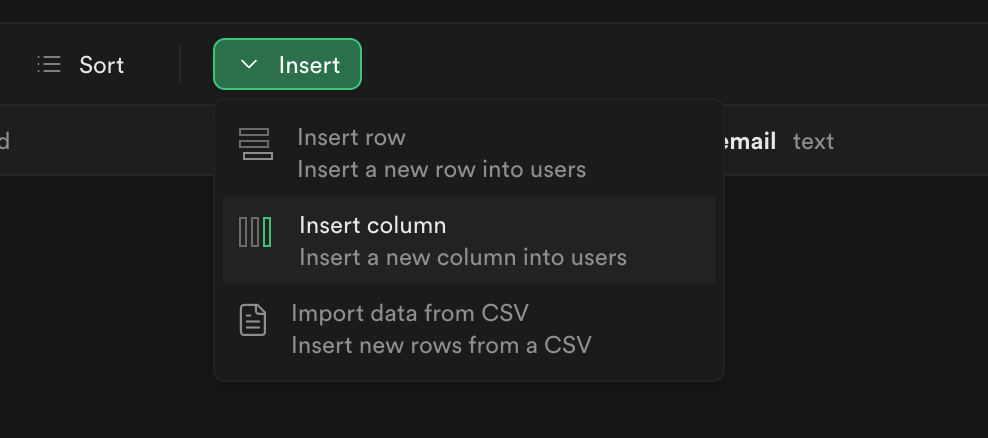
- Go to the Table Editor (opens in a new tab).
- Select the table where you want to add a new column.
- Click on the Insert dropdown and then Insert Column.
Create a Supabase Storage Bucket (optional)
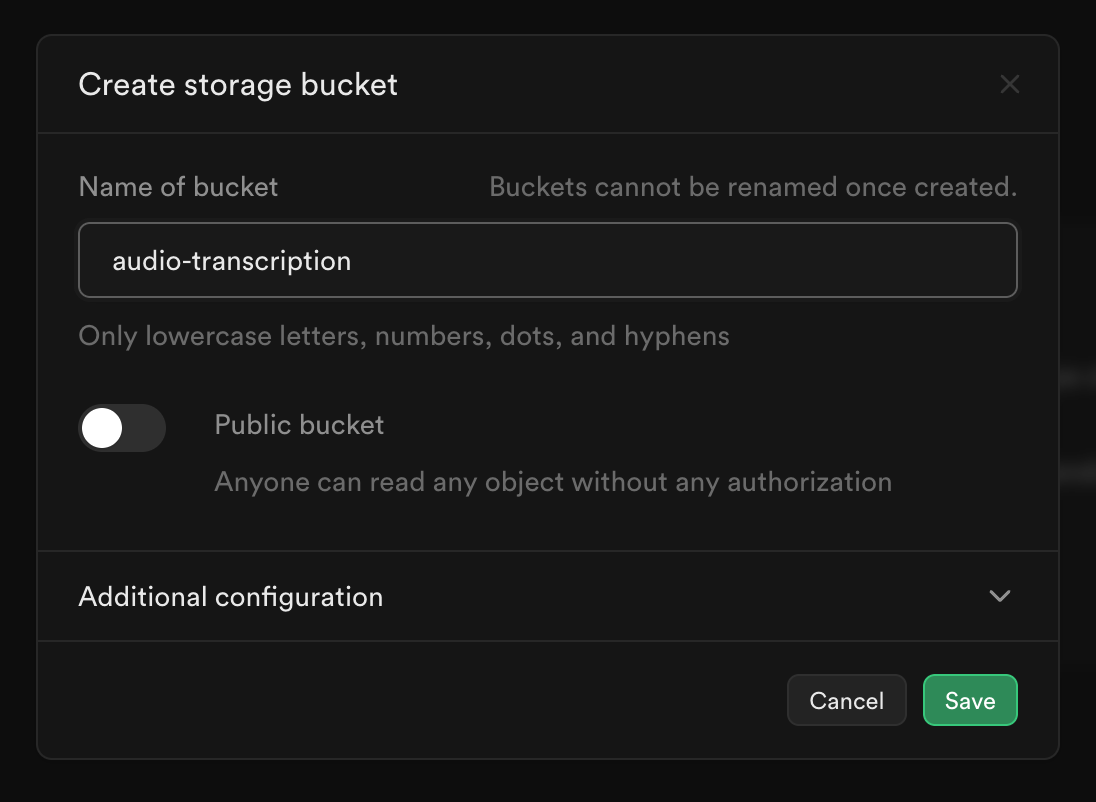
- Go to Storage (opens in a new tab) in supabase dashboard.
- Click on New Bucket. A modal will open a shown below.
- Enter the bucket name, and Save.
Add RLS policy for the Supabase storage bucket
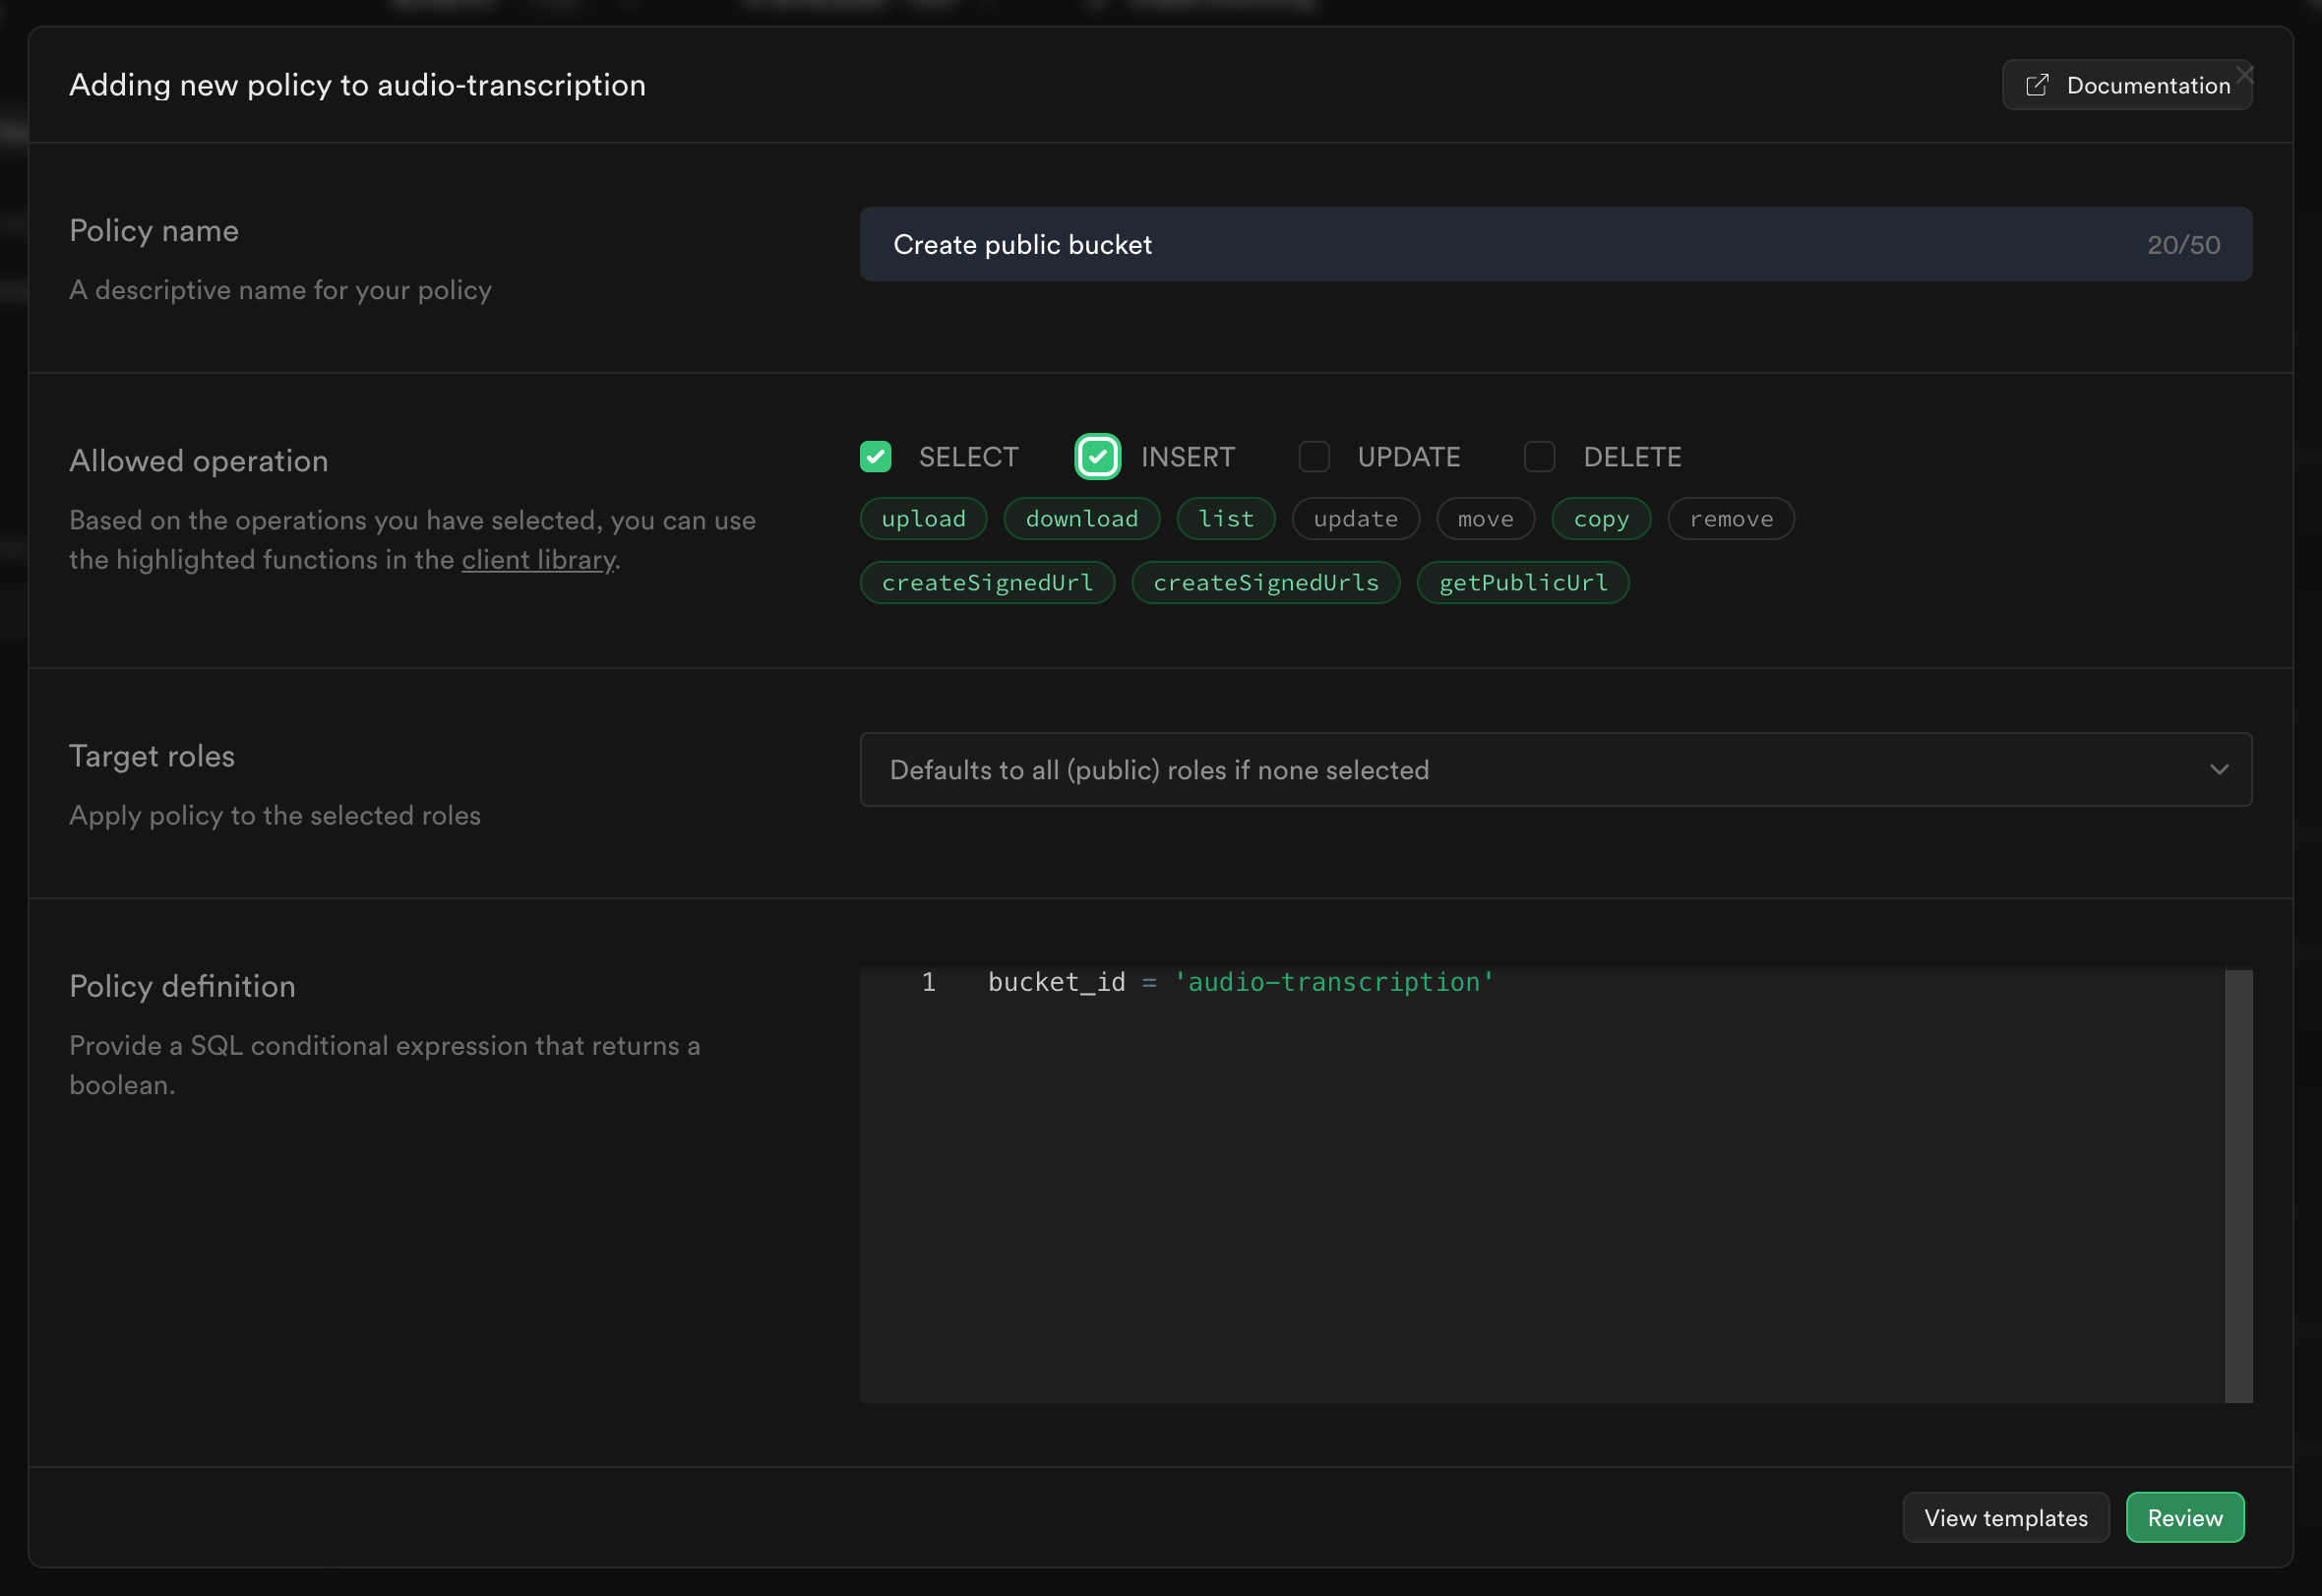
- Go to Storage Policies (opens in a new tab). You will find the recently created storage as shown below.

- Click on New policy.
- Select For full customization.
- Now, enter a policy name and select operation as INSERT and SELECT. Leave the Policy definition field default as it is.
- Click on Add Review. Then, Save Policy.
Sync the Table Schema with the Project
Now that you have completed the Supabase setup, let's sync the table schema with the project.
-
First, log in to your Supabase account:
terminalsupabase loginFollow the prompts in your terminal to log in. This step ensures that your CLI can interact with your Supabase projects.
-
Navigate to the root of your repository where you have initialized a Supabase project. If you haven't initialized one yet, you can do so by running:
terminalsupabase init -
Now, run the following command to sync the database with the project:
terminalnpx supabase gen types typescript --project-id [PROJECT_ID] --schema public > src/types/supabase.tsTo get the Project ID, go to the General Settings (opens in a new tab) in the dashboard. You will find the Reference ID, which is your Project ID.